
There is nothing quite like stepping out onto a clean, beautiful deck to enjoy a warm afternoon with family and friends. However, weather, pollen, and daily foot traffic can quickly turn that beautiful outdoor retreat into a dingy, slippery surface covered in dirt and green algae.
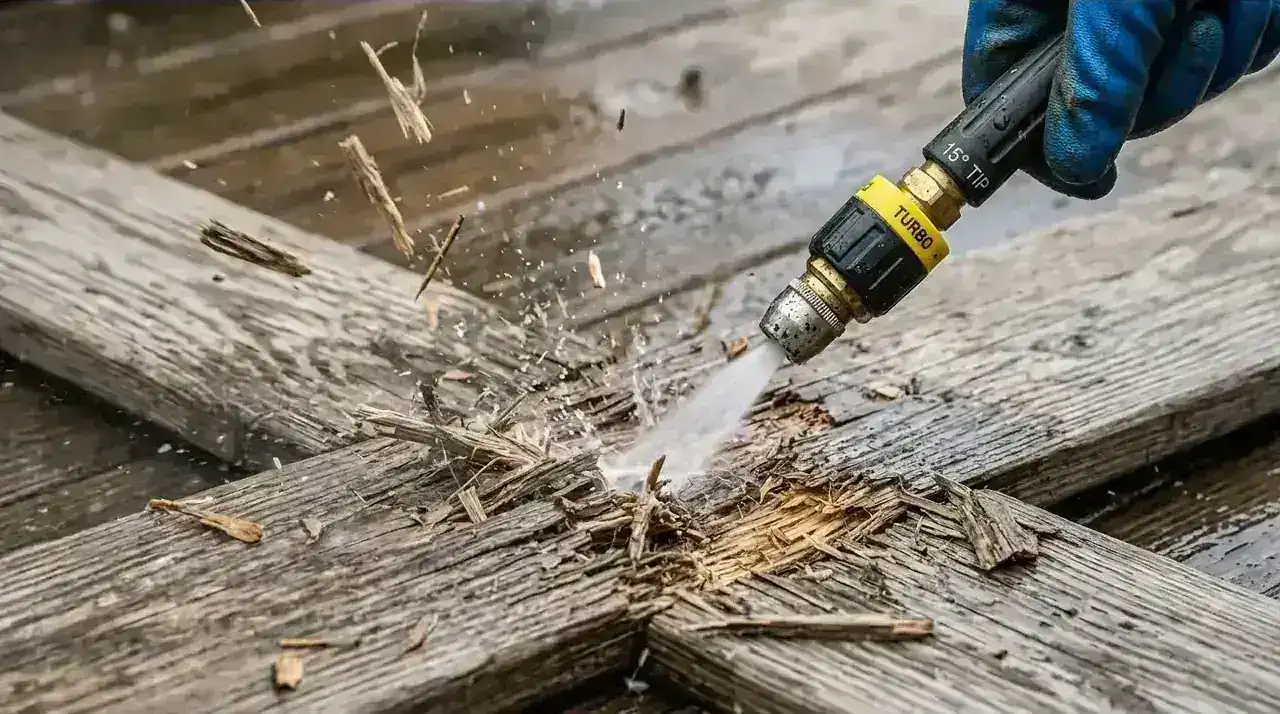
If your backyard oasis is looking a little tired, do not rush out to rent a high-powered pressure washer just yet. Blasting your deck with intense water pressure can permanently scar wood fibers and ruin composite finishes.
Cleaning your deck safely and effectively is all about using the right technique and letting the right cleaner do the heavy lifting. This comprehensive guide breaks down the process into simple, manageable steps to safely restore your deck, ensuring it is ready for summer entertaining.
The Ultimate Deck Cleaning Checklist
Before rolling up your sleeves, gather the right tools and materials. Choosing the proper solution depends entirely on your deck material.
Required Tools & Equipment
-
Garden hose with a high-quality spray nozzle.
-
Pump sprayer (for even, efficient chemical application).
-
Stiff-bristled scrub brush with a long handle (use synthetic bristles; never use a wire brush on wood).
-
Plastic bucket for mixing.
-
Safety gear: Safety glasses, rubber boots, and chemical-resistant gloves.
Material & Chemical Guide
-
For Standard Wood Decks (Pressure-Treated, Cedar, Pine): Sodium percarbonate (oxygen-based bleach). This eco-friendly powder mixes with water to break down organic stains, mold, and mildew without destroying wood cells or killing your garden.
-
For Exotic Hardwoods (Ipe, Garapa): Oxalic acid-based cleaner. This helps lift deep stains and reverses the silver-gray weathering common to hardwoods.
-
For Composite Decking: A specialized manufacturer-recommended composite cleaner or mild dish soap and warm water.
Approximate Project Costs (CAD$)
| Item | Estimated Cost |
| Sodium Percarbonate / Deck Cleaner | CAD$ 25 – CAD$ 50 |
| Long-Handled Synthetic Scrub Brush | CAD$ 20 – CAD$ 35 |
| 4-Gallon Pump Sprayer | CAD$ 30 – CAD$ 60 |
| Total Estimated Investment | CAD$ 75 – CAD$ 145 |
Step-by-Step Deck Cleaning Guide
To achieve professional-grade results without damaging your boards, follow this proven six-step method.
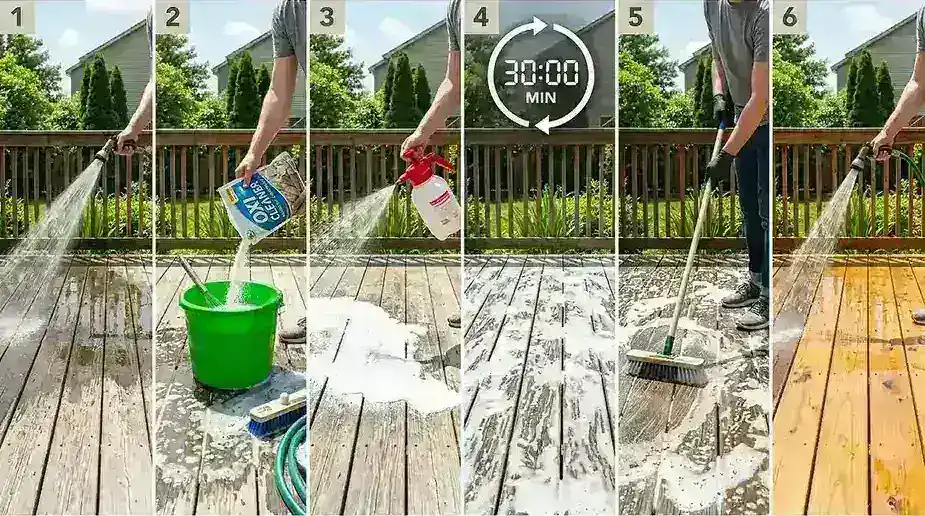
Step 1: Prep the Area and Wet Your Deck
Clear all furniture, barbecues, and planters off the deck. Use a broom or a putty knife to clean out any packed leaves, twigs, or debris trapped between the deck boards. Good airflow between boards prevents future rot. Next, use your garden hose to thoroughly soak the entire surface. Wetting the wood fibers first protects them from absorbing too much concentrated cleaner at once.
Step 2: Dilute Your Cleaner
Following the instructions on your product package, mix your sodium percarbonate powder or specialized cleaner with water in a large bucket. For oxygen-based cleaners, using warm water helps the powder dissolve completely and activates the oxygen bubbles that lift the grime.
Step 3: Apply the Solution
Pour the mixed solution into your pump sprayer and apply it evenly across the deck surface. Work in manageable sections, roughly 50 to 100 square feet at a time, so the cleaner does not dry out while you work. Start on the railings and balusters if you have them, working your way down to the floorboards.
Step 4: Maximize Dwell Time
Let the solution sit on the wood for the manufacturer-specified dwell time, usually between 10 and 15 minutes. This gives the chemical reaction time to break down deep-seated mold, mildew, and dirt. Keep a close eye on the deck; if a section begins to dry out, lightly mist it with water or apply a bit more cleaner to keep it active.
Step 5: Scrub Along the Grain
Grab your stiff-bristled synthetic scrub brush and scrub the deck boards. Always scrub parallel to the wood grain or board pattern. Scrubbing across the grain can scratch softer woods like cedar and leave unsightly marks. The cleaner should have done most of the hard work, so you do not need to apply bruising pressure.
Step 6: Rinse Clean
Finally, thoroughly wash away the dirt and soapy residue using a garden hose with a clean-water spray nozzle. Start from the side closest to the house and work your way outward. Make sure to rinse until the water runs completely clear, leaving no soapy film behind.
Pro Tips & Common Mistakes to Avoid
The Chlorine Bleach Trap
Never use standard household laundry bleach (sodium hypochlorite) on a wood deck. While it kills surface mildew quickly, chlorine bleach breaks down lignin, the natural glue holding wood fibers together. This results in a washed-out, unnatural white appearance, opens the pores to absorb more dirt, and leads to premature splintering.
Pressure Washer Caution
If you do choose to use a pressure washer, use extreme caution. For softwoods like cedar, keep the pressure exceptionally low, between 400 and 600 PSI. For standard pressure-treated lumber, never exceed 1000 PSI. Always use a wide fan tip (25 to 40 degrees), keep the wand moving in long sweeping strokes, and maintain a safe distance of at least 12 inches from the wood.
Protect Your Landscape
Even eco-friendly cleaners can stress your plants if applied in high concentrations. Heavily douse nearby grass, shrubs, and perennial gardens with clean water before and after you clean the deck. The water dilutes any accidental overspray, protecting your landscaping.
Bring Back the Shine
A clean deck does more than just improve your home's curb appeal, it actively extends the life of your investment by removing wood-destroying organic matter. By following this gentle, chemical-assisted cleaning routine once or twice a year, you keep your outdoor living area safe, beautiful, and inviting.
If you are planning to apply a fresh coat of solid stain or penetrating oil after cleaning, make sure to let the wood dry completely for at least 48 to 72 hours of clear, dry weather.
Frequently Asked Questions (FAQ)
How often should I clean my backyard deck?
It is best practice to clean your deck at least once or twice a year. A great strategy is to clean it right after the major spring pollen season ends, which deprives mold and mildew of a primary food source heading into the humid summer months.
Can I use the same cleaning process for a composite deck?
Yes, the basic steps of wetting, applying soap, scrubbing, and rinsing apply to composite decks. However, you should swap out wood-specific chemicals for mild dish soap or a dedicated composite deck cleaner. Never use heavy chemical strippers or brighteners on composite materials.
Why does my wood deck look dark or gray even after scrub cleaning?
Cleaning removes dirt and organic growth, but sun exposure causes wood to oxidize and turn gray. To restore the bright, original wood tone, apply a wood brightener containing oxalic acid right after cleaning. It neutralizes the wood's pH balance and instantly brings back its vibrant, natural color.
How long must I wait to walk on the deck after rinsing?
You can walk on the deck as soon as it is completely dry to the touch, which usually takes a few hours on a warm, sunny day. However, if you intend to apply a sealer or stain, wait a minimum of 2 to 3 days to ensure no deep moisture is trapped in the wood cells.
0 comment(s)
Leave a comment